Buffer
Buffer
说到nio就离不开Buffer体系,类图:
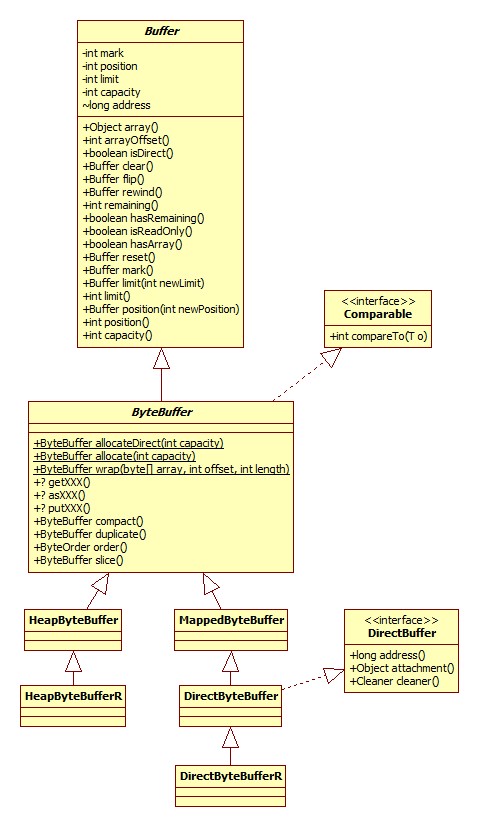
这里以ByteBuffer为例,其实对于布尔类型的其它所有基本类型,都与一种Buffer与之对应,比如还有ShortBuffer。
图中的getXXX指的是获得各种数据类型的便利方法,比如getChar,getInt,putXXX也是一样。asXXX指到其它类型Buffer的转换方法,比如asCharBuffer。
注意,只有ByteBuffer才拥有getXXX, putXXX, asXXX等向其它类型转换的方法,也只有ByteBuffer可以获取direct类型的buffer。
获取
allocate
得到heap buffer,源码:
1public static ByteBuffer allocate(int capacity) {
2    return new HeapByteBuffer(capacity, capacity);
3}
HeapByteBuffer构造器:
1HeapByteBuffer(int cap, int lim) {
2    super(-1, 0, lim, cap, new byte[cap], 0);
3}
可以看出,heap buffer的底层其实就是byte数组,构造完成之后各属性的状态如下:
- mark: 0
- pos: 0
- limit: capacity
- offset: 0
allocateDirect
获取direct buffer,只有ByteBuffer才可以:
1public static ByteBuffer allocateDirect(int capacity) {
2    return new DirectByteBuffer(capacity);
3}
DirectByteBuffer构造器:
 1DirectByteBuffer(int cap) {
 2    super(-1, 0, cap, cap);
 3    boolean pa = VM.isDirectMemoryPageAligned();
 4    int ps = Bits.pageSize();
 5    long size = Math.max(1L, (long)cap + (pa ? ps : 0));
 6    Bits.reserveMemory(size, cap);
 7    long base = 0;
 8    try {
 9        base = unsafe.allocateMemory(size);
10    } catch (OutOfMemoryError x) {
11        Bits.unreserveMemory(size, cap);
12        throw x;
13    }
14    unsafe.setMemory(base, size, (byte) 0);
15    if (pa && (base % ps != 0)) {
16        // Round up to page boundary
17        address = base + ps - (base & (ps - 1));
18    } else {
19        address = base;
20    }
21    cleaner = Cleaner.create(this, new Deallocator(base, size, cap));
22    att = null;
23}
内存对齐
VM.isDirectMemoryPageAligned()用以判断JVM是否需要对堆外内存进行对齐,什么是内存页,什么是对齐参考:
此参数可以通过-Dsun.nio.PageAlignDirectMemory进行指定,默认是关闭的,在64位Windows JDK上实践证明-XX:[+|-]PageAlignDirectMemory不能用,提示未识别的参数。
最大堆外内存
VM.saveAndRemoveProperties部分源码:
 1public static void saveAndRemoveProperties(Properties props) {
 2    String s = (String)props.remove("sun.nio.MaxDirectMemorySize");
 3    if (s != null) {
 4        if (s.equals("-1")) {
 5            // -XX:MaxDirectMemorySize not given, take default
 6            directMemory = Runtime.getRuntime().maxMemory();
 7        } else {
 8            long l = Long.parseLong(s);
 9            if (l > -1)
10                directMemory = l;
11        }
12    }
13}
可以看出,我们可以通过参数-XX:MaxDirectMemorySize或-Dsun.nio.MaxDirectMemorySize进行指定,那么默认大小又是多少呢?
Runtime.maxMemory为native实现,注意以字节为单位。源码:
1JNIEXPORT jlong JNICALL
2Java_java_lang_Runtime_maxMemory(JNIEnv *env, jobject this) {
3    return JVM_MaxMemory();
4}
JVM_MaxMemory为JVM源码,位于hotspot\src\share\vm\prims\jvm.cpp中:
1JVM_ENTRY_NO_ENV(jlong, JVM_MaxMemory(void))
2  JVMWrapper("JVM_MaxMemory");
3  size_t n = Universe::heap()->max_capacity();
4  return convert_size_t_to_jlong(n);
5JVM_END
- 再往下深入需要自己搭建JVM源码环境,这里留个坑
内存页大小
Bits.pageSize:
1static int pageSize() {
2    if (pageSize == -1)
3        pageSize = unsafe().pageSize();
4    return pageSize;
5}
Unsafe的pageSize为native方法,最终由os_solaris.cpp中的vm_page_size方法实现:
1int os::vm_page_size() {
2  assert(page_size != -1, "must call os::init");
3  return page_size;
4}
可以看出,此参数由init方法提供,相关源码:
1void os::init(void) {
2    page_size = sysconf(_SC_PAGESIZE);
3    init_page_sizes((size_t) page_size);
4}
- 再留个坑
内存预留
Bits.reserveMemory方法用以记录JVM当前direct内存的占用情况,注意这里只是记录,而不是真正的分配。源码:
 1static void reserveMemory(long size, int cap) {
 2    if (!memoryLimitSet && VM.isBooted()) {
 3        maxMemory = VM.maxDirectMemory();
 4        memoryLimitSet = true;
 5    }
 6    // optimist!
 7    if (tryReserveMemory(size, cap)) {
 8        return;
 9    }
10    final JavaLangRefAccess jlra = SharedSecrets.getJavaLangRefAccess();
11
12    // retry while helping enqueue pending Reference objects
13    // which includes executing pending Cleaner(s) which includes
14    // Cleaner(s) that free direct buffer memory
15    while (jlra.tryHandlePendingReference()) {
16        if (tryReserveMemory(size, cap)) {
17            return;
18        }
19    }
20    // trigger VM's Reference processing
21    System.gc();
22
23    // a retry loop with exponential back-off delays
24    // (this gives VM some time to do it's job)
25    boolean interrupted = false;
26    try {
27        long sleepTime = 1;
28        int sleeps = 0;
29        while (true) {
30            if (tryReserveMemory(size, cap)) {
31                return;
32            }
33            if (sleeps >= MAX_SLEEPS) {
34                break;
35            }
36            if (!jlra.tryHandlePendingReference()) {
37                try {
38                    Thread.sleep(sleepTime);
39                    sleepTime <<= 1;
40                    sleeps++;
41                } catch (InterruptedException e) {
42                    interrupted = true;
43                }
44            }
45        }
46
47        // no luck
48        throw new OutOfMemoryError("Direct buffer memory");
49
50    } finally {
51        if (interrupted) {
52            // don't swallow interrupts
53            Thread.currentThread().interrupt();
54        }
55    }
56}
tryReserveMemory方法负责真正的预留工作:
 1 private static boolean tryReserveMemory(long size, int cap) {
 2    long totalCap;
 3    while (cap <= maxMemory - (totalCap = totalCapacity.get())) {
 4        if (totalCapacity.compareAndSet(totalCap, totalCap + cap)) {
 5            reservedMemory.addAndGet(size);
 6            count.incrementAndGet();
 7            return true;
 8        }
 9    }
10    return false;
11}
maxMemory表示最大可分配的堆外内存,totalCapacity表示当前已分配的内存,这里使用了CAS,直到操作(分配)成功为止。但是如果堆外空余内存不够了,怎么办?JVM会尝试进行堆外内存的回收工作,参见内存回收一节,可以总结为以下三步:
-
手动调用ReferenceHandler的tryHandlePending方法,处理可能存在的处于pending状态的非强类型的引用(特别是Cleaner)。
-
尝试手动触发垃圾回收,注意正是因为这个原因,如果使用了堆外内存,谨慎设置JVM
-XX:+DisableExplicitGC。
-
自旋+睡眠等待(可能的垃圾回收完成),共自旋9次,每次睡眠1ms。
内存分配
相关代码:
 1long size = Math.max(1L, (long)cap + (pa ? ps : 0))
 2long base = 0;
 3try {
 4    base = unsafe.allocateMemory(size);
 5} catch (OutOfMemoryError x) {
 6    Bits.unreserveMemory(size, cap);
 7    throw x;
 8}
 9unsafe.setMemory(base, size, (byte) 0);
10//内存裁剪
11if (pa && (base % ps != 0)) {
12    // Round up to page boundary
13    address = base + ps - (base & (ps - 1));
14} else {
15    address = base;
16}
allocateMemory为native方法,通过malloc实现。setMemory方法的作用为将分配的内存区块的值全部设为0(最后一个参数便是要填充的值),因为malloc分配的内存的值实际上是上一次使用的值,即垃圾。
setMemory的实现位于JVM copy.cpp的fill_to_memory_atomic方法:
 1void Copy::fill_to_memory_atomic(void* to, size_t size, jubyte value) {
 2  address dst = (address) to;
 3  uintptr_t bits = (uintptr_t) to | (uintptr_t) size;
 4  if (bits % sizeof(jlong) == 0) {
 5    jlong fill = (julong)( (jubyte)value ); // zero-extend
 6    if (fill != 0) {
 7      fill += fill << 8;
 8      fill += fill << 16;
 9      fill += fill << 32;
10    }
11    //Copy::fill_to_jlongs_atomic((jlong*) dst, size / sizeof(jlong));
12    for (uintptr_t off = 0; off < size; off += sizeof(jlong)) {
13      *(jlong*)(dst + off) = fill;
14    }
15  //忽略int,short整倍数的情况
16  } else {
17    // Not aligned, so no need to be atomic.
18    Copy::fill_to_bytes(dst, size, value);
19  }
20}
可以看出,如果申请的内存是long长度的整倍数,那么使用手动逐一赋值的方式,否则使用系统调用memset(hotspot\src\cpu\x86\vm\copy_x86.hpp)。为什么手动逐一赋值就能保证原子性呢?
如果设置了内存对齐,系统实际上比需要的内存多申请一个页的大小,即如果我们需要 4100的内存,而页大小是4096(64位Windows便是这个大小),实际申请了4100 + 4096 = 8196字节的内存,这么做是为了后续的对齐,对齐的关键代码:
1address = base + ps - (base & (ps - 1));
这样的结果就是起始的内存地址是一个页的起始地址,好处便是CPU在读取内存可以少读一个内存页。
内存回收
由于direct buffer位于堆外,所以JVM垃圾回收自然无法对齐进行回收。一个完整的堆外内存由两部分组成:
- 堆内的DirectBuffer对象,持有堆外内存的地址。
- 堆外内存("冰山"内存)。
所以一旦DirectBuffer对象被JVM回收,就没有其它对象知道与之对应的堆外内存的地址,也就造成了内存泄漏。这一问题的解决方法就是当DirectBuffer对象不再被需要(即可以进行回收)时由GC线程进行通知,通知我们可以回收掉堆外内存。那如何得到通知呢?
这便是Java里面Reference和ReferenceQueue的用途了,这一部分可以参考:
DirectByteBuffer构造器相关源码:
1DirectByteBuffer(int cap) {
2    cleaner = Cleaner.create(this, new Deallocator(base, size, cap));
3}
Cleaner负责堆外内存的回收,这是Java中一种代替finalize方法的方式,类图:
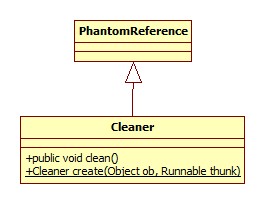
既然是代替,那么它必然解决了finalize的缺点:
- 如果一个类重写了finalize()方法,那么JVM会将其包装成为java.lang.ref.Finalizer对象,由JVM维护其多余的状态,这无疑加重了JVM的负担。
- finalize()方法由Finalizer.FinalizerThread线程负责调用,而此线程是一个优先级非常低的线程,这就导致Finalizer可能永远无法被回收。
Cleaner的实现特点:
-
由Reference.ReferenceHandler线程负责调用其clean方法,其run方法源码:
1public void run() {
2  while (true) {
3      tryHandlePending(true);
4  }
5}
tryHandlePending部分源码:
 1static boolean tryHandlePending(boolean waitForNotify) {
 2  synchronized (lock) {
 3      if (pending != null) {
 4          r = pending;
 5          c = r instanceof Cleaner ? (Cleaner) r : null;
 6        }
 7    }
 8    // Fast path for cleaners
 9  if (c != null) {
10      c.clean();
11      return true;
12  }
13}
而ReferenceHandler是一个优先级较高的线程,这就保证了清理的及时性。
和普通的Java对象一样,如果DirectByteBuffer对象晋升到了老年代,那么除非发生Full GC,否则其对应的堆外内存将会一直存在,因为Cleaner的清理发生在引用处理阶段,即JVM将其状态标记为pending时,这样就有可能耗尽系统内存(JVM heap内存反而有剩余)。参考:
回收
Cleaner的clean方法其实是对Cleaner.create的第二个参数run方法的调用,所以真正清理的载体是DirectByteBuffer的内部类Deallocator,其实现了Runnable接口:
1public void run() {
2    unsafe.freeMemory(address);
3    address = 0;
4    Bits.unreserveMemory(size, capacity);
5}
由函数free实现。
手动回收
从类图可以看出,堆外内存实现了sun.nio.ch.DirectBuffer接口,而此接口定义了cleaner方法以获取与之对应的清理器,所以我们可以在这里手动调用其clean方法。
wrap
ByteBuffer.wrap:
1public static ByteBuffer wrap(byte[] array, int offset, int length) {
2    try {
3        return new HeapByteBuffer(array, offset, length);
4    } catch (IllegalArgumentException x) {
5        throw new IndexOutOfBoundsException();
6    }
7}
wrap得到的buffer只能是heap buffer。
数据读取
我们以HeapByteBuffer的getInt(int i)方法为例:
1public int getInt(int i) {
2    //默认是大端
3    return Bits.getInt(this, ix(checkIndex(i, 4)), bigEndian);
4}
checkIndex用于检查在当前位置是否还有4字节的数据可读。
ix是在当前位置(i)的基础上加上偏移:
1protected int ix(int i) {
2    return i + offset;
3}
为什么需要偏移呢?因为ByteBuffer允许我们以byte数组为基础创建buffer,当然指定一个偏移也就是清理之中了。
Bits.getInt:
1static int getInt(ByteBuffer bb, int bi, boolean bigEndian) {
2    return bigEndian ? getIntB(bb, bi) : getIntL(bb, bi) ;
3}
以大端getIntB为例:
1static int getIntB(ByteBuffer bb, int bi) {
2    return makeInt(bb._get(bi),bb._get(bi + 1),bb._get(bi + 2),bb._get(bi + 3));
3}
4static private int makeInt(byte b3, byte b2, byte b1, byte b0) {
5    return (((b3) << 24) | ((b2 & 0xff) << 16) | ((b1 & 0xff) <<  8) | ((b0 & 0xff)));
6}
很容易理解了,高位在左边。
视图
我们可以在一个Buffer之上创建一个视图,视图和之前的buffer使用同一份数据(即视图的写原生buffer也能看见),但拥有自己的属性,比如position, limit。
我们以HeapByteBuffer的asIntBuffer为例:
1public IntBuffer asIntBuffer() {
2    //int buffer的数据长度为byte buffer除以4
3    int size = this.remaining() >> 2;
4    int off = offset + position();
5    return (bigEndian
6            ? (IntBuffer)(new ByteBufferAsIntBufferB(this,-1,0,size,size,off))
7            : (IntBuffer)(new ByteBufferAsIntBufferL(this,-1,0,size,size,off)));
8}
构造器只是属性的拷贝,不再赘述。我们来看一下数据的读取,以大端的int读取为例:
1public int get(int i) {
2    return Bits.getIntB(bb, ix(checkIndex(i)));
3}
和ByteBuffer的实现基本一致,唯一的区别是ix方法,ByteBufferAsIntBufferB.ix:
1protected int ix(int i) {
2    return (i << 2) + offset;
3}
乘以4再加偏移。
压缩整理
compact方法允许我们将内容拷贝至数组开头,比如我们有一段数据从4-9,compact之后便是从0-5.HeapByteBuffer.compact:
1public ByteBuffer compact() {
2    System.arraycopy(hb, ix(position()), hb, ix(0), remaining());
3    position(remaining());
4    limit(capacity());
5    discardMark();
6    return this;
7}
很简单,就是一个数组拷贝再重新设置属性的过程。
复制
duplicate方法可以返回一个buffer的拷贝,拷贝与原buffer共享一份存储,拥有自己的属性(但初始时和原buffer完全一致)。
slice
和复制、视图一样,这货也是在共享数据存储的情况下搞出一个新的buffer来,相当于compact和duplicate两个过程的组合,HeapByteBuffer.slice:
1public ByteBuffer slice() {
2    return new HeapByteBuffer(hb,-1,0,this.remaining(),
3        this.remaining(),this.position() + offset);
4}